You know that feeling when your car looks like it just rolled out of the dealership? That smooth, glossy finish is what we all want, right? Well, getting that fresh-off-the-lot shine doesn’t have to be complicated or expensive. If you’ve got a drill and a few basic tools, you’re already on your way to achieving a mirror-like finish. In this guide, we’ll break down everything you need to know about buffing and polishing your car with a drill, so you can shine up your ride like a pro!
Preparing Your Car and Tools for Buffing and Polishing
Before diving into the actual buffing and polishing process, preparation is key. Whether you’re a first-time DIY-er or someone who’s been tinkering with your car for a while, getting things right from the start will ensure the best results.
Clean Your Car Thoroughly
It sounds obvious, but you’d be surprised how many people skip this step! If your car isn’t clean, all the buffing and polishing in the world won’t give you that flawless shine. Start by washing your car with a high-quality car shampoo. Use a microfiber cloth to avoid scratching the paint, and make sure to clean every nook and cranny, including the wheels. Don’t forget to dry your car after washing it; otherwise, water spots might form during the buffing process, which can be a real pain to fix later.
Inspect Your Car’s Paint
Next, take a good look at your car’s paint. Are there any deep scratches or imperfections? If your car’s paint is in rough shape, you might want to consider applying some paint correction before buffing and polishing. This can be a bit more advanced, but it’ll make the buffing process more effective. If the paint is in decent condition, you can proceed to the next step.
Gather the Right Tools
Now, onto the tools! You’ll need:
- A drill: A standard cordless drill will work fine, but if you’ve got a variable-speed drill, that’s even better.
- Polishing pads: Choose a pad specifically designed for cars, like a foam pad, that attaches to your drill.
- Buffing compound: This is the product you’ll use to remove any imperfections in the paint. There are different types, so make sure you choose one that suits your car’s needs.
- Polishing compound: This compound smooths out the paint after buffing, giving it a glossy finish.
- Microfiber towels: These are essential for cleaning up any excess product after buffing and polishing.
- Masking tape: This comes in handy for protecting areas you don’t want to polish, like trim or rubber seals.
Make sure you have everything on hand before you begin. Running back and forth to get something you forgot can ruin the flow of your work.
Work in a Shaded Area
Buffing and polishing in direct sunlight isn’t ideal. The heat can cause the products to dry too quickly, leading to streaks or a cloudy finish. Find a shaded area or work indoors if possible.
Step-by-Step Guide to Buffing and Polishing Your Car Using a Drill
Now that you’ve gathered your materials and your car is ready, it’s time to get into the nitty-gritty of buffing and polishing. Here’s your step-by-step guide:
Step 1: Apply Masking Tape to Sensitive Areas
Start by using the masking tape to cover areas you don’t want to buff or polish. These can include things like the edges of windows, trim, or rubber seals. While you can buff right up to these areas, it’s best to protect them, especially if they’re made of materials that might be damaged by the polish or compound.
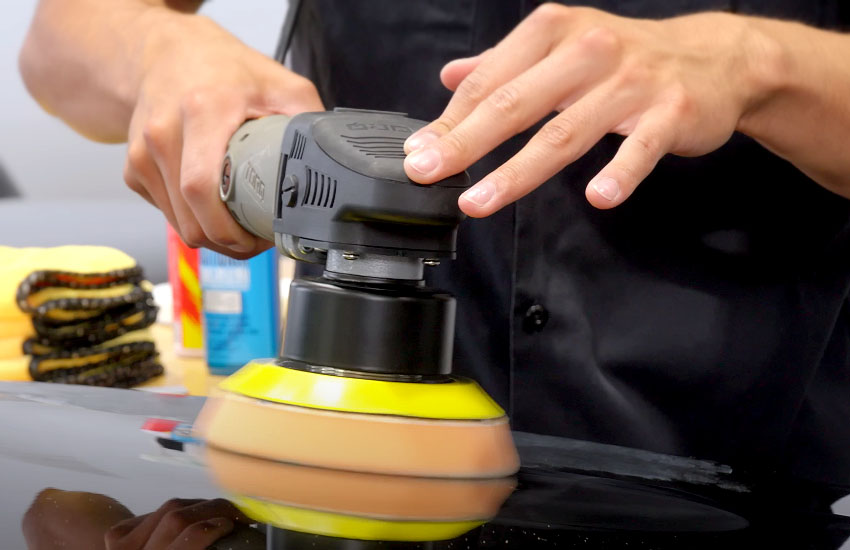
Step 2: Attach the Buffing Pad to the Drill
Now, take your buffing pad and securely attach it to your drill. If your drill has adjustable speed settings, start with a lower speed. You don’t need to go full throttle right away — a moderate speed will work best, allowing you to control the pressure and get the best results.
Step 3: Apply Buffing Compound
Put a small amount of buffing compound onto the pad — don’t go overboard. A little goes a long way. Using too much product will just create a mess and could make the process longer than necessary. Place the drill on the surface of the car, and spread the compound in a small circular motion to avoid uneven coverage.
Step 4: Buff in Circular Motions
Now, it’s time to start buffing! Turn the drill on and move it in small, circular motions. The goal is to work the compound into the paint. Make sure to keep the drill moving constantly to avoid creating swirl marks. You don’t want to leave it in one spot for too long because that could lead to overheating and potential paint damage. Work in sections so you can focus on getting each part done right.
Step 5: Check for Swirl Marks and Imperfections
After you’ve buffed a section, step back and inspect the paint. If you notice any swirl marks or imperfections, you may need to go over it a little longer with the buffing compound. Sometimes, buffing in different directions — horizontally and vertically — can help eliminate any streaks or marks.
Step 6: Wipe Away Excess Compound
Once you’re happy with a section, turn off the drill and use a clean microfiber towel to wipe away any excess compound. Be gentle, and make sure you’re not just pushing the compound around. You want to remove all the excess for a clean surface before moving on to polishing.
Step 7: Apply Polishing Compound
Once the buffing compound is off and the surface is smooth, it’s time to apply the polishing compound. This step is key to getting that shiny, mirror-like finish. Just like with the buffing compound, apply a small amount of polish to the pad and work it into the paint in small, circular motions.
Step 8: Final Wipe and Inspection
After polishing, use a fresh microfiber towel to wipe off the excess product. Take a step back and inspect your work. Does the paint look smooth and shiny? If not, you can go over the areas again, but remember, patience is key. This isn’t a race — it’s about achieving the best possible finish.
Step 9: Enjoy the Results!
Once you’re done buffing and polishing, it’s time to sit back and admire your work. The car should have a glossy, smooth finish that looks brand new. You can even feel the difference when you run your hand along the surface — it should be sleek and smooth to the touch.
I hope this guide has helped you feel confident in buffing and polishing your car using a drill. With the right tools, a little patience, and some practice, you can achieve a professional-quality finish at home. Your car will look better than ever, and you’ll be proud to show it off!
Frequently Asked Questions
Is it safe to buff and polish a car with a drill?
Yes, buffing and polishing a car with a drill is completely safe as long as you follow the right steps and use the proper tools.
Can I use any drill for buffing my car?
Ideally, you want to use a drill that has adjustable speeds. A standard cordless drill will work, but variable-speed drills provide better control.
Do I need to be careful about pressure when buffing my car?
Yes, applying too much pressure can cause swirl marks or even damage the paint. It’s important to let the drill do the work with light pressure.
Is it necessary to mask off areas of the car when buffing and polishing?
Yes, masking off sensitive areas like rubber trim, windows, or headlights is recommended to prevent accidental damage.
Can I buff and polish a car with dark-colored paint?
Yes, you can buff and polish cars with dark-colored paint. However, be extra careful with product application, as dark colors can show imperfections more easily.
Do I need to use a special compound for my car’s paint?
There are different compounds for various types of paint, but in general, a good quality buffing and polishing compound should work for most cars.
Is it important to work in the shade when buffing?
Yes, working in direct sunlight can cause the product to dry too quickly, which could leave streaks or an uneven finish. Try to work in a shaded area.
Can I buff and polish my car in one session?
Yes, you can, but make sure to take your time and give each section the attention it needs for the best possible result.