Is your car acting up and giving you trouble when you start it? Or maybe the engine seems a bit off? It might be time to check your crankshaft position sensor. Don’t worry, though! Changing this sensor can seem a little intimidating, but with the right knowledge and a few tools, you’ll be able to handle it.
In this guide, we’ll walk you through what a crankshaft position sensor is, why it matters, and how to change it step by step. Whether you’re a seasoned car enthusiast or a complete beginner, we’ve got you covered with easy-to-understand instructions.
What is a Crankshaft Position Sensor and Why is it Important?
Have you ever wondered what makes your car’s engine tick smoothly? It’s not just about the fuel and spark plugs. A crankshaft position sensor is one of those often-overlooked components that plays a huge role in your engine’s performance. It might seem small, but it’s definitely mighty when it comes to keeping your engine running efficiently.
What Does the Crankshaft Position Sensor Do?
The crankshaft position sensor does exactly what its name suggests. It monitors the position of the crankshaft, which is a part of the engine that converts the up-and-down motion of the pistons into rotational movement. It helps to control when the engine’s fuel injectors and spark plugs should fire. Without accurate timing, your engine won’t run properly, which can lead to poor performance, trouble starting, or even engine failure.
Types of Crankshaft Position Sensors
Not all crankshaft position sensors are made the same. There are generally two types: magnetic and optical. Magnetic sensors are more common and work by using a magnet to detect the position of a toothed wheel attached to the crankshaft. Optical sensors use light to detect the same thing, but they’re typically found in higher-end vehicles.
Regardless of the type, both sensors serve the same purpose: they send signals to the car’s computer, which adjusts the timing for fuel and spark.
Why is it Important to Keep Your Crankshaft Position Sensor in Good Shape?
The crankshaft position sensor may be small, but it’s vital to your engine’s performance. If it stops working, the engine may not start, or it could stall while driving. You’ll likely notice a few signs of trouble before this happens, such as poor engine performance, difficulty starting your car, or your check engine light turning on.
An unreliable sensor can also lead to erratic engine behavior, like misfires, rough idling, or stalling at low speeds. All of these issues can be frustrating and dangerous to deal with, especially if you’re on the road.
So, now that you understand how important the crankshaft position sensor is, let’s dive into how to replace it and get your engine running like new again.
Step-by-Step Guide to Changing a Crankshaft Position Sensor
Changing a crankshaft position sensor might sound like a tough job, but it’s totally manageable if you have the right tools and follow the steps. You don’t have to be a mechanic to replace this part, but patience and attention to detail are key. In this section, we’ll go over everything you need to know to swap out your old sensor and install a new one.
Tools and Materials You’ll Need
Before you start, it’s important to gather all the tools and materials you’ll need. Here’s a list to help you get prepared:
- A new crankshaft position sensor (make sure it’s the right one for your car model)
- Socket wrench set with different sized sockets
- Screwdrivers (Phillips and flathead)
- A jack and jack stands (if necessary)
- Ratchet and extension bars
- Torque wrench
- Protective gloves and safety glasses
Step 1: Safety First!
Before you get started, make sure you’re working in a safe environment. Always wear gloves and safety glasses to protect your hands and eyes from dirt and debris. If you need to lift the car, use a jack and jack stands to elevate the vehicle, and always make sure the car is securely supported before crawling underneath.
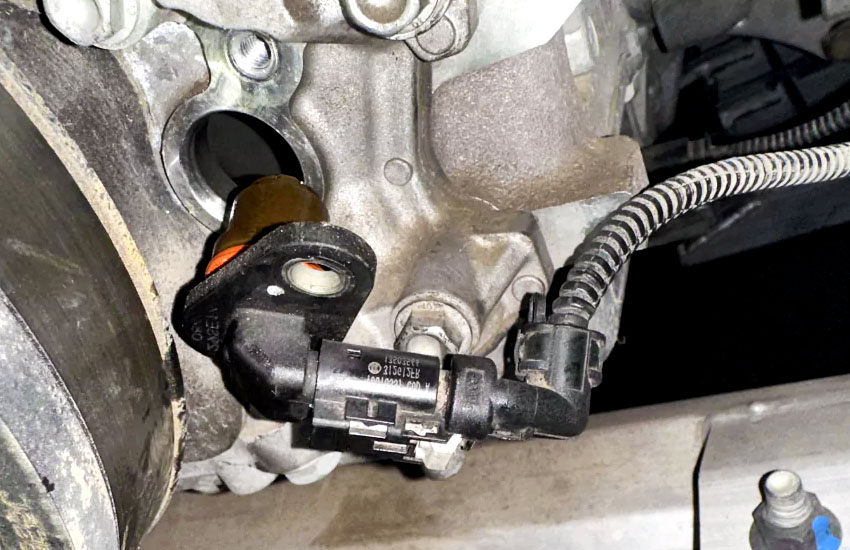
Step 2: Locate the Crankshaft Position Sensor
The location of the crankshaft position sensor varies depending on your vehicle, so it’s important to refer to your car’s manual for specifics. Generally, the sensor is located near the crankshaft or the timing belt. In most cases, it’s located at the front of the engine block, either on the side or in the lower part of the engine.
Once you have the location, you might need to remove a few components to get to it. For example, you may have to take off the engine cover, air intake hose, or other parts that might be in the way.
Step 3: Disconnect the Battery
Before you start working on any electrical components, always disconnect the battery. This prevents any accidental shocks and keeps you safe while you work on the engine. Use a wrench to remove the negative terminal of the battery first. Once it’s disconnected, you can safely move on to the next steps.
Step 4: Remove the Old Crankshaft Position Sensor
Next, you’ll need to remove the old crankshaft position sensor. Typically, it’s held in place with one or two bolts. Use your socket wrench to remove these bolts and carefully pull the sensor out. Be cautious not to damage the wiring connected to it.
Sometimes, sensors can be stuck in place, so you may need to gently wiggle it or use a flathead screwdriver to loosen it. Don’t apply too much force, though, as you don’t want to break anything.
Step 5: Install the New Crankshaft Position Sensor
Now it’s time to install the new crankshaft position sensor. Make sure it’s the correct one for your vehicle and that it fits properly. Position the sensor in the same spot where the old one was, and screw it into place with the bolts you removed earlier. Use a torque wrench to tighten the bolts to the manufacturer’s recommended specifications.
Step 6: Reconnect the Battery
Once the sensor is securely in place, it’s time to reconnect the battery. Attach the negative terminal back to the battery, and tighten it with a wrench. Double-check that everything is securely connected.
Step 7: Test the New Sensor
Before calling it a day, it’s important to test the new sensor. Start the car and check the engine for any unusual sounds or vibrations. If everything seems smooth, you’re good to go!
Additionally, if your check engine light was on before, it should turn off after replacing the sensor. If the light stays on, you may need to clear the error codes using an OBD-II scanner.
Step 8: Final Checks
After you’ve tested the sensor, go for a quick drive to make sure the engine is running smoothly. Pay attention to how the car accelerates and idles. If everything seems to be running fine, you’ve successfully replaced your crankshaft position sensor!
I hope this guide has helped you feel more confident about changing your crankshaft position sensor. It’s a simple job with the right tools and a bit of patience. Remember, this sensor plays a huge role in keeping your engine running smoothly, so replacing it can make a big difference in how your car performs. If you have any questions, feel free to drop a comment!
Frequently Asked Questions
Is it hard to replace a crankshaft position sensor?
It’s not too difficult if you follow the steps carefully. With the right tools and a little patience, you can do it yourself.
Can I drive my car with a faulty crankshaft position sensor?
It’s not recommended. A faulty sensor can cause your car to stall or have trouble starting. It’s best to replace it as soon as possible.
Do I need to disconnect the battery before replacing the crankshaft position sensor?
Yes, always disconnect the battery before working on any electrical components to prevent shocks or accidental short circuits.
Is there a way to test a crankshaft position sensor before replacing it?
Yes, you can use an OBD-II scanner to check for error codes related to the sensor. A faulty sensor will often trigger a check engine light.
Can a bad crankshaft position sensor cause a car to stall?
Yes, if the sensor isn’t working properly, it can cause the engine to stall, misfire, or have trouble starting.
Do I need any special tools to change a crankshaft position sensor?
You’ll need a basic set of tools, such as a socket wrench, torque wrench, and screwdrivers. It’s also helpful to have a jack and jack stands.
Is the crankshaft position sensor the same as the camshaft position sensor?
No, they are different sensors. The crankshaft position sensor monitors the crankshaft, while the camshaft position sensor monitors the camshaft.
Can I replace the crankshaft position sensor myself, or should I take it to a mechanic?
You can replace it yourself if you feel comfortable with basic car maintenance. However, if you’re unsure, a mechanic can do it for you.


