If you’re feeling a bit lost about how to check your crankshaft position sensor with a multimeter, don’t worry! I’ve got your back. Whether you’re trying to diagnose engine problems or just want to be sure your sensor is working properly, testing it yourself with a multimeter is one of the most reliable methods. This guide will break things down in a fun, easy-to-understand way, so you’ll feel like a pro by the end. Trust me, by the time you’re done reading this, you’ll know exactly what to do!
Understanding the Crankshaft Position Sensor and Its Role
Alright, let’s start with the basics. If you’re here, you probably know that the crankshaft position sensor (often abbreviated as CKP sensor) is an important part of your car’s engine. But do you know why it’s so important? It’s not just a random piece of tech; it plays a key role in making sure your engine runs smoothly.
The crankshaft position sensor tracks the position of the crankshaft, which is basically the part of the engine that keeps everything moving in sync. This sensor feeds data to the Engine Control Unit (ECU), telling it the exact position and speed of the crankshaft. This data is crucial for controlling fuel injection and ignition timing. In short, the sensor helps the engine control the spark and fuel, which means the engine gets the exact amount of fuel at the right time for optimal performance.
Without a working crankshaft position sensor, your engine could experience misfires, poor fuel economy, or even fail to start altogether. Imagine you’re rushing to work, and suddenly, your engine stalls. You start the car again, but it won’t budge. Chances are, the crankshaft sensor could be the culprit. Don’t let that happen to you! Knowing how to test this sensor can save you time and money.
Now, how do you check if the sensor is working as it should? The answer is simple: use a multimeter. This handy tool can help you test whether your crankshaft position sensor is giving the right readings. We’ll dive deeper into this step by step, but first, let’s look at the different types of crankshaft position sensors.
Types of Crankshaft Position Sensors
There are two primary types of crankshaft position sensors: magnetic and Hall effect sensors. These sensors work a little differently, but they all do the same job—keeping track of your crankshaft’s position.
Magnetic Sensors: These are often found in older vehicles. They use a magnetic field to detect the position of the crankshaft. As the crankshaft turns, it moves a metal ring that interacts with the sensor’s magnetic field. This generates a signal, which is sent to the ECU. When testing a magnetic sensor with a multimeter, you’re usually measuring the resistance between the terminals.
Hall Effect Sensors: These are more common in newer cars and are a bit more advanced. Hall effect sensors use a semiconductor material to generate a voltage signal when exposed to a magnetic field. Unlike magnetic sensors, which just create a signal based on movement, Hall effect sensors provide a more consistent and accurate signal. To test these sensors, you’ll be measuring the voltage output while the engine is running.
No matter which type you have, knowing how to test the crankshaft position sensor will help you figure out if it’s time for a replacement or if you need to check for other potential issues.
Step-by-Step Guide to Testing a Crankshaft Position Sensor With a Multimeter
Now, let’s get into the juicy part—the how-to. Don’t worry, you don’t need to be a car expert to pull this off! With just a few tools (like a multimeter) and a little patience, you can test the sensor yourself. Below, I’ve broken down the process into easy steps that anyone can follow. Ready? Let’s dive in!
Step 1: Locate the Crankshaft Position Sensor
Before you get started with testing, you need to find where the crankshaft position sensor is located. The location can vary depending on your vehicle’s make and model, but it’s usually located near the crankshaft pulley or flywheel.
If you’re having trouble locating it, don’t panic. You can usually find a diagram in your vehicle’s repair manual. You could also search online for your car’s specific location. Once you’ve got that down, it’s time to disconnect the sensor from the wiring harness. Make sure you’ve turned off the engine and removed the key from the ignition before starting.
Step 2: Set Up Your Multimeter
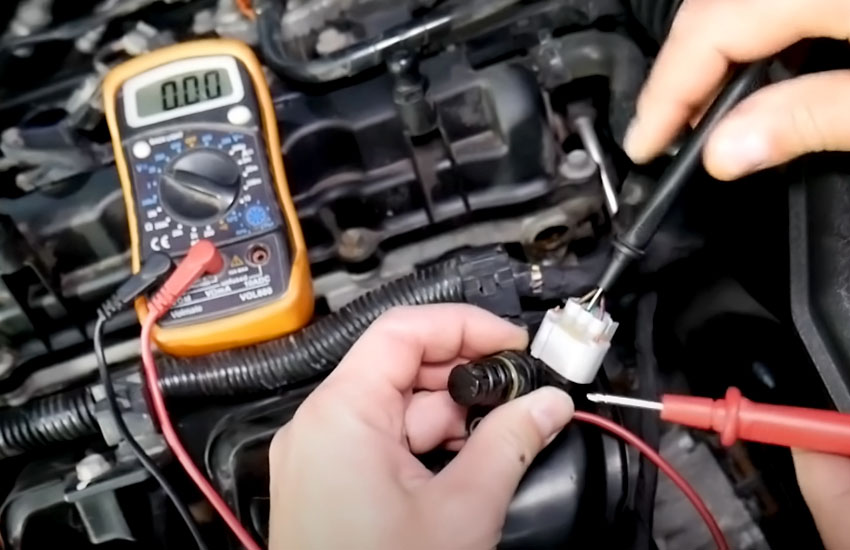
Now that you’ve found the sensor, you’ll need to grab your multimeter. If you don’t have one yet, you can find affordable digital multimeters at most hardware stores or online. Once you’ve got your multimeter in hand, set it to the appropriate setting based on the type of sensor you have.
- For a magnetic sensor, you’ll need to set your multimeter to measure resistance (Ω).
- For a Hall effect sensor, you’ll set the multimeter to measure AC voltage.
Once your multimeter is set up correctly, you’re ready to start testing.
Step 3: Check the Sensor for Resistance (Magnetic Sensor)
For a magnetic sensor, the next step is to check its resistance. To do this, you’ll need to place the multimeter’s probes on the two terminals of the crankshaft position sensor. The multimeter will display a resistance value in ohms (Ω).
Now, the key here is that each sensor has a specific resistance range that it should be within. You can usually find this information in the service manual for your car. If the reading falls outside the expected range, your sensor is likely faulty and may need replacing. If the reading is within range, the sensor might still be good.
Step 4: Test for Voltage Output (Hall Effect Sensor)
For Hall effect sensors, things get a little more interesting. Instead of checking for resistance, you’ll be looking for voltage output. This sensor sends a signal to the ECU, and that signal should change as the engine cranks.
Here’s what you need to do:
- With the ignition turned on and the engine cranking, use your multimeter to measure the voltage across the sensor’s terminals.
- A properly working Hall effect sensor will send an alternating signal (on and off) in sync with the crankshaft’s movement.
If the voltage reading is steady or doesn’t fluctuate, that’s a sign that the sensor is faulty and needs to be replaced.
Step 5: Inspect the Wiring and Connectors
Sometimes, a faulty sensor might not be the issue at all. Instead, it could be a problem with the wiring or connectors. Over time, wires can get damaged, fray, or corrode. So, before you call it quits, make sure to inspect the wiring that connects the sensor to the ECU.
Check for any visible signs of damage, and ensure the connectors are clean and tightly attached. If the wiring looks good, you can rule it out as the source of the problem.
Step 6: Test the ECU
In some cases, the issue might not even be with the crankshaft position sensor itself but with the ECU that receives its signal. If you’ve tested the sensor and the wiring, but your car still isn’t running properly, you might want to check the ECU for any faults. This might require professional diagnostic equipment, but it’s something to consider if the sensor checks out fine.
I hope this guide helped clear up any confusion about testing your crankshaft position sensor with a multimeter. It’s easier than you might think, and with a little practice, you can confidently test the sensor yourself. Just remember to follow the steps carefully, and always double-check your readings. With these skills under your belt, you’ll be able to keep your engine running smoothly and avoid costly repairs. You’ve got this!
Frequently Asked Questions
Is it safe to test a crankshaft position sensor with a multimeter?
Yes, it is safe to test a crankshaft position sensor with a multimeter as long as you take proper precautions. Always disconnect the vehicle battery before working with electrical components to avoid shocks or short circuits.
Can a faulty crankshaft position sensor cause engine misfires?
Yes, a malfunctioning crankshaft position sensor can lead to engine misfires. It provides critical information to the engine control unit (ECU) for proper timing, so if it fails, the engine may not run correctly.
Do I need any special tools to test a crankshaft position sensor?
The main tool you’ll need is a digital multimeter. It’s a simple and affordable tool that can measure voltage and resistance. No special tools are required beyond this.
Is it possible to test a crankshaft position sensor without starting the engine?
For magnetic sensors, you typically need to crank the engine to check for resistance. For Hall effect sensors, you’ll need the engine running to check for voltage changes, so testing is best done with the engine cranking.
Can a faulty crankshaft position sensor cause stalling?
Yes, a faulty sensor can cause stalling, as it may send incorrect data to the ECU, disrupting the engine’s fuel injection and ignition timing, which leads to engine stalling.
Do I need to replace the crankshaft position sensor immediately if it’s faulty?
If the crankshaft position sensor is found to be faulty, it’s recommended to replace it as soon as possible to avoid engine misfires or stalling issues. Driving with a faulty sensor can cause further damage to the engine.
Is it difficult to replace a faulty crankshaft position sensor?
Replacing a faulty crankshaft position sensor is usually a straightforward process. Depending on your vehicle, it may involve unbolting the sensor, disconnecting the wiring, and installing a new one. Always follow the manufacturer’s instructions.
Can a multimeter test other car sensors besides the crankshaft position sensor?
Yes, a multimeter can be used to test other sensors in your vehicle, such as the camshaft position sensor or temperature sensors. The principles of testing remain the same: measure resistance or voltage output depending on the type of sensor.


